Friday, March 18, 2011

Lube Check Mitsibushi Pajero 2.5 L Diesel


I have a Pajero 2.5 L Diesel.  It is in wonderfully 'sound' condition, but because it is a 1990 model I still do a weekly check on the all the lubes and fluids under the hood.  Here are some of the lubes and fluids that need routine/weekly checking:

The Engine Oil.  Look for the dipstick and pull it out.  Remember not to check the engine oil after the engine has run.  Best time is in the morning before starting the engine. 


The Oil level should be on FULL - that the the notch closest to the dipstick handle


 Check the level of the Coolant in the engine by opening the radiator cap.  Note that the engine must be cool when you open the radiator cap.  The level of the coolant be touching the bottom of the smallest rim you see in the picture.


 Check the level of the coolant in the overflow tank of the radiator (to the right of the radiator).. The level should be between low and full


 The Brake Fluid.  The level of the brake fluid should be between low and full.


 The Hydraulic Clutch Fluid.  The level of this fluid should be between low and full as well.


The Power Steering Fluid.  Twist the cap and pull out the dipstick (rather fast so you can see the level of the fluid before it runs down).  The level of this fluid should be between low and full as well.


The Washer fluid (water).  There is a reservoir (for the washes fluid) opposite to the overflow tank of the radiator and then another one next to the power steering reservoir and also one in the backdoor that serves the rear window.  These water reservoirs can just be topped up with cooled kettle water


 That's the weekly check!

Good value for money products.. 

 Mobil MOBIL 1 ATF Automatic Transmission Fluid 

Prestone 50/50 Antifreeze Coolant, 1 GalMobil 1 44999 5w40 Turbo Diesel Truck - 1 gallon, Pack of 2  

Thursday, March 17, 2011

Changing Strings on the Acoustic Guitar

My Cort CJ 10X acoustic guitar needed some fresh strings, the old ones have gone a bit stale now. So this is how I did it..................
  • Loosen up the strings by turning the tuning machine head in the opposite direction.  Unwind them enough so that you can get your hand into the soundhole without any hassle


  • Use an Euro Coin and carefully push the pegs from inside the soundbox back up and out of the bridge
                                                                         
  •  Remove all the bridge pins and then pull the ends of the strings, one-by-one out.  Then also unwind the strings from around the tuning machine head and disconnect them.  Be careful not to get the end of the string (especially the 1st or 2nd string) stuck into your finger, it is painful!


  • Open a pack of the good old D'Addario Acoustic Guitar strings.  Make sure you have the correct gauge (thickness) for your guitar - it's usually a personal preference.


  • Push the ball ends of each string into their correct holes on the saddle. Push the pin into the hole, keeping the string in place. Once all the pins have been inserted, slowly pull each string towards you to get rid of excess play.


  • Push the opposite end of the string through the hole on the tuning machine head.  Give the string a slight bend as you wrap it around the tuning machine head.  Remember, the thickest string, the 6th string is always closest to you (holding the guitar in the playing position) and the thinnest string, the 1st string is always the furthest away from you.  Hope that makes sense!


  • Once all the strings have been connected to the tuning machine head, you can slowly start tightening the strings - preferably adding a little bit of tension at a time to each string, so that the neck tensions up evenly.  There will lots of wirey bits of string sticking from the head stock of the guitar, be careful not to get any of it in your eyes.


  • Grab your guitar tuner and start tuning your strings.  I use the Qwik Tune Tuner, it is a simple and reliable gadget. It even has a 'jack input' if there is too much noise around when you want to tune up.   Stretch each string (by lifting it like you see in the picture) after you've tuned it, giving each string a good pull away from the soundhole.  Do this a couple of times, it really helps to get the string into 'tuning mode'. You will have to stretch those string daily for the next two days or so.


  • Now, trim the string ends that are sticking out over at the headstock area, using something like a side cutter pliers.

 Happy Acoustic Vibes!!!!


These are some of  my favourite products..


D'Addario EJ17 Phosphor Bronze Acoustic Guitar Strings, Medium


Qwik Tune QT11 Tuner & Pitchpipe Combo            Dunlop Formula 65 Guitar Polish & Cleaner

Wednesday, March 2, 2011

Re-Fitting Door Strip

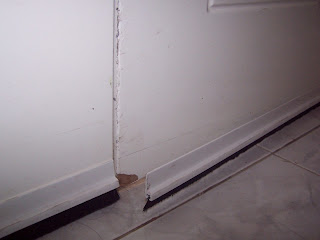
I bought these door strip to stick at the bottom of our front door.  They have adhesive tape which made it easy to install, but the adhesive has rapidly worn off and the strip has come loose.  So here we go hands on D.I.Y....


Here is a shot of the loose door strip.  Firstly, carefully remove the strip from the door


 Then, clean the back of the strip with a chemical like Thinners


 Also clean the surface area on the door where you will be sticking the strip to


Now use some Bison Universal Contact Glue and put a film of glue on the door.  Any kind of universal glue would do but Bison is at the top of my list! 


Make sure that you put a film of glue on the contact area of the strip.  Allow the glue on both surfaces to dry for up to 45 Minutes


Lastly carefully align and then evenly push the strip onto the bottom of the door


 That's it in a nutshell!